Linux Windows CentOS Web Server DNS PHP MySql
แสดงบทความที่มีป้ายกำกับ web server แสดงบทความทั้งหมด

วันพฤหัสบดีที่ 1 สิงหาคม พ.ศ. 2556


This is only a quick note, on how to disable SELinux on a system using command line tools: Open file /etc/sysconfig/selinux which should more or less be like this:

# This file controls the state of SELinux on the system. 
# SELINUX= can take one of these three values: 
#           enforcing - SELinux security policy is enforced. 
#           permissive - SELinux prints warnings instead of enforcing. 
#           disabled - SELinux is fully disabled. 
SELINUX=enforcing 
# SELINUXTYPE= type of policy in use. Possible values are: 
#           targeted - Only targeted network daemons are protected. 
#           strict - Full SELinux protection. 
SELINUXTYPE=targeted


Next, find the line saying: SELINUX=enforcing and replace it with SELINUX=disabled

save and reboot.

Note: Be very careful when editing this file. the other day. occidentally changed the value of SELINUXTYPE to something other than the allowed values and managed to completely prevent my 6.4 CentOS kernel from booting. (God save the live CD's ...)


This is only a quick note, on how to disable SELinux on a system using command line tools: Open file /etc/sysconfig/selinux which should more or less be like this:

# This file controls the state of SELinux on the system. 
# SELINUX= can take one of these three values: 
#           enforcing - SELinux security policy is enforced. 
#           permissive - SELinux prints warnings instead of enforcing. 
#           disabled - SELinux is fully disabled. 
SELINUX=enforcing 
# SELINUXTYPE= type of policy in use. Possible values are: 
#           targeted - Only targeted network daemons are protected. 
#           strict - Full SELinux protection. 
SELINUXTYPE=targeted


Next, find the line saying: SELINUX=enforcing and replace it with SELINUX=disabled

save and reboot.

Note: Be very careful when editing this file. the other day. occidentally changed the value of SELINUXTYPE to something other than the allowed values and managed to completely prevent my 6.4 CentOS kernel from booting. (God save the live CD's ...)

วันอังคารที่ 30 กรกฎาคม พ.ศ. 2556


Here is a basic guide to install Centos 6 ( for beginners ) . Before proceeding with the installation, please make sure you have a compatible hardware resource , Centos installation CD/DVD. ( you candownload a fresh iso from http://www.centos.org/modules/tinycontent/index.php?id=30 )
let’s start ..
Put the Centos CD/DVD into the CD/DVD Drive .

» press F12 or Delete Key( Depends upon your motherboard / Brand ) . Select CD-ROM Drive

bootmenu
[or]
» You can change first boot device to CD-ROM in Bios Setup ( Mostly F2 key for Bios setup ).


biossetup


Installation will start now. ( Follow the Screenshots and steps ).

centos6-step-1

centos6-step-1

Step 1 » The Setup starts now . Choose “Install or upgrade an existing system” and press Enter.
Step 2 » It will ask your confirmation for testing your CD / DVD media . Just pressSkip if you are using newly burned DVD ( Better test your DVD if it is old one).
Step 3 » Installation will starts now . Press Next .
Step 4 » choose language (English) and press Next .
Step 5 » Again choose keyboard (U.S. English) and press Next .
Step 6 » Now choose Storage device type . choose “Basic Storage Devices” and pressNext ( For advanced storage like SAN , NAS , ISCSI , you need to choose second option) .
Step 7 » It will show warning for using new hard disk . Press “yes, discard any data “ .
Step 8 » Type hostname and press Next .
Step 9 » Choose Time zone and press Next .
Step 10 » Type root password and press Next .
Step 11 » Now choose “Use All Space” and press Next ( it will use entire Disk for CentOS) .
Step 12 » It will show warning to creating partition structure on your hard disk . Press “write changes to disk” .
Step 13 » Now choose minimal in the list ( Server Type : we can configure later ) and press Next .
Step 14 » It will start installing centos after checking dependencies .
Step 15 » After completing installation press Reboot .
Step 16 »Now you have successfully installed Centos . Type username “root” and password ( type root password) and press Enter.


Here is a basic guide to install Centos 6 ( for beginners ) . Before proceeding with the installation, please make sure you have a compatible hardware resource , Centos installation CD/DVD. ( you candownload a fresh iso from http://www.centos.org/modules/tinycontent/index.php?id=30 )
let’s start ..
Put the Centos CD/DVD into the CD/DVD Drive .

» press F12 or Delete Key( Depends upon your motherboard / Brand ) . Select CD-ROM Drive

bootmenu
[or]
» You can change first boot device to CD-ROM in Bios Setup ( Mostly F2 key for Bios setup ).


biossetup


Installation will start now. ( Follow the Screenshots and steps ).

centos6-step-1

centos6-step-1

Step 1 » The Setup starts now . Choose “Install or upgrade an existing system” and press Enter.
Step 2 » It will ask your confirmation for testing your CD / DVD media . Just pressSkip if you are using newly burned DVD ( Better test your DVD if it is old one).
Step 3 » Installation will starts now . Press Next .
Step 4 » choose language (English) and press Next .
Step 5 » Again choose keyboard (U.S. English) and press Next .
Step 6 » Now choose Storage device type . choose “Basic Storage Devices” and pressNext ( For advanced storage like SAN , NAS , ISCSI , you need to choose second option) .
Step 7 » It will show warning for using new hard disk . Press “yes, discard any data “ .
Step 8 » Type hostname and press Next .
Step 9 » Choose Time zone and press Next .
Step 10 » Type root password and press Next .
Step 11 » Now choose “Use All Space” and press Next ( it will use entire Disk for CentOS) .
Step 12 » It will show warning to creating partition structure on your hard disk . Press “write changes to disk” .
Step 13 » Now choose minimal in the list ( Server Type : we can configure later ) and press Next .
Step 14 » It will start installing centos after checking dependencies .
Step 15 » After completing installation press Reboot .
Step 16 »Now you have successfully installed Centos . Type username “root” and password ( type root password) and press Enter.


FTP – File transfer protocol is used to transfer files from one host to another over TCP . Configuring ftp server on linux is safe and secure .
In this article we can see how to configure ftp server on centos 6 . please follow the steps.


Configuring ftp server on Centos 6:

Step 1 » Vsftpd is a lightweight FTP server package for Centos (linux) . Startinstalling package by issuing below command.

[root@leela ~]# yum -y install vsftpd

Step 2 » After installation, Open the file /etc/vsftpd/vsftpd.conf which is the config file for vsftpd ( I mean FTP server ) .Find the below line Replace YES to NO to disable anonymous login ( Login without username and password ). Uncomment the below line to disable chroot access ( optional )

Step 3 » Create a folder where you want to store FTP data. In my case i’m going to create in / ( root folder ) like below .
[root@leela ~]# mkdir /ftp
Step 4 » Now start creating users for accessing ftp server .

[root@leela ~]# useradd -d /ftp/krizna krizna
[root@leela ~]# passwd krizna
Changing password for user krizna.
New password:


You just created username krizna with home directory /ftp/krizna .

Step 5 » Start vsftpd service by issuing the below command.


[root@leela ~]# service vsftpd start
and type this below command to start ftp server service automatically while booting.

[root@leela ~]# chkconfig --levels 235 vsftpd on
Step 6 » That’s it, Now we can check the FTP access .Create some files in /ftp/krizna folder

[root@leela ~]# touch /ftp/krizna/test
[root@leela ~]# touch /ftp/krizna/test1
[root@leela ~]# touch /ftp/krizna/test2

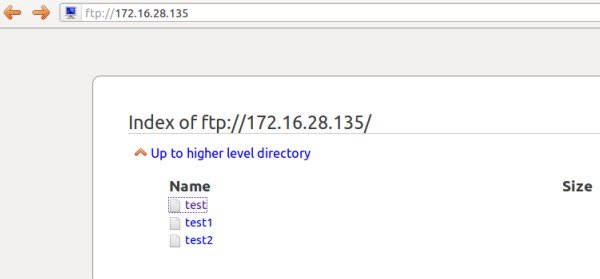
Now open ftp path in remote machine browser ftp://ftp-server-IP ( ftp://172.16.28.135 ). You can see the created files after authentication.

configure ftp server on centos 6
You can use Filezilla or winscp tools to upload/download files from FTP server.


Troubleshooting :
If you not able to connect ftp server , Disable the firewall ( iptables ) and selinux service on your ftp server .

Disable firewall ( Iptables ) »
[root@leela ~]# service iptables stop
[root@leela ~]# chkconfig iptables off

Disable Selinux » open the file /etc/selinux/config and find the line

SELINUX=enforcing
and replace with
SELINUX=disabled

now reboot the server and try again.


FTP – File transfer protocol is used to transfer files from one host to another over TCP . Configuring ftp server on linux is safe and secure .
In this article we can see how to configure ftp server on centos 6 . please follow the steps.


Configuring ftp server on Centos 6:

Step 1 » Vsftpd is a lightweight FTP server package for Centos (linux) . Startinstalling package by issuing below command.

[root@leela ~]# yum -y install vsftpd

Step 2 » After installation, Open the file /etc/vsftpd/vsftpd.conf which is the config file for vsftpd ( I mean FTP server ) .Find the below line Replace YES to NO to disable anonymous login ( Login without username and password ). Uncomment the below line to disable chroot access ( optional )

Step 3 » Create a folder where you want to store FTP data. In my case i’m going to create in / ( root folder ) like below .
[root@leela ~]# mkdir /ftp
Step 4 » Now start creating users for accessing ftp server .

[root@leela ~]# useradd -d /ftp/krizna krizna
[root@leela ~]# passwd krizna
Changing password for user krizna.
New password:


You just created username krizna with home directory /ftp/krizna .

Step 5 » Start vsftpd service by issuing the below command.


[root@leela ~]# service vsftpd start
and type this below command to start ftp server service automatically while booting.

[root@leela ~]# chkconfig --levels 235 vsftpd on
Step 6 » That’s it, Now we can check the FTP access .Create some files in /ftp/krizna folder

[root@leela ~]# touch /ftp/krizna/test
[root@leela ~]# touch /ftp/krizna/test1
[root@leela ~]# touch /ftp/krizna/test2

Now open ftp path in remote machine browser ftp://ftp-server-IP ( ftp://172.16.28.135 ). You can see the created files after authentication.

configure ftp server on centos 6
You can use Filezilla or winscp tools to upload/download files from FTP server.


Troubleshooting :
If you not able to connect ftp server , Disable the firewall ( iptables ) and selinux service on your ftp server .

Disable firewall ( Iptables ) »
[root@leela ~]# service iptables stop
[root@leela ~]# chkconfig iptables off

Disable Selinux » open the file /etc/selinux/config and find the line

SELINUX=enforcing
and replace with
SELINUX=disabled

now reboot the server and try again.

วันจันทร์ที่ 29 กรกฎาคม พ.ศ. 2556

วันนี้เรามาเรียนรู้วิธีการติดตั้ง Web Server โดยเราจะทำการติดตั้ง apache ให้ทำหน้าที่เป็น Web Server (http) และติดตั้ง mod_ssl เพื่อเอาไว้ใช้ทำ Secure Web Server (https) จากนั้นจะทำการติดตั้ง php และ php extension ต่างๆ เพื่อเอาไว้ใช้กับโปรแกรมที่เขียนด้วย php ซึ่งในบทความนี้ จะไม่ได้พูดถึงการใช้งานภาษา Perl, Python หรือโปรแกรมภาษาอื่นๆ หากผู้อ่านสนใจ ก็ตามไปศึกษาจากแหล่งข้อมูลอื่นๆ กันตามสะดวก และถ้าหากมีโอกาสในคราวหน้าก็อยากจะลองใช้ nginx ซึ่งเป็น Web Server ที่ผู้คนสนใจกันเยอะมากอีกตัวหนึ่ง อ่ะเริ่มกันเลยครับ
เริ่มจากติดตั้ง httpd และ mod_ssl โดยใช้คำสั่ง

1
# yum install httpd mod_ssl

ระบบจะแสดงข้อมูลและแพกเก็จต่างๆที่ต้องติดตั้ง ให้กด y เพื่อทำการติดตั้งต่อไป
เปิดไฟล์ /etc/httpd/conf/httpd.conf และเพิ่มหรือแก้ไขบรรทัด ServerName ลงไป โดยให้ใส่เป็นชื่อของเซอเวอร์ของเราลงไป
1
# nano /etc/httpd/conf/httpd.conf


จากนั้นทำการ start service httpd ด้วยคำสั่ง
1
# service httpd start


ทดสอบเปิดเว็บไซต์ดูได้เลย
1
http://192.168.10.10/

เมื่อติดตั้ง apache เรียบร้อยแล้วเราก็มาติดตั้ง php และ php extension ต่างๆกันต่อ อย่างแรกใช้คำสั่ง yum list php* เพื่อดูว่ามี php extension อะไรบ้างที่น่าสนใจ ให้จดหรือจำชื่อของ extension ต่างๆที่ต้องการเอาไว้
1
# yum list php*

ทำการติดตั้ง php และ php extension ต่างๆ ที่ต้องการ
1
# yum install php-common php-cli php-devel php-mysql php-gd php-imap php-mbstring php-mhash php-pear php-xml php-xmlrpc

ต่อไปทำการสร้างไฟล์ info.php ในโพลเดอร์ /var/www/html/ ด้วยคำสั่ง
1
# nano /var/www/html/info.php
และพิมพ์ Source Code ของ PHP ลงไปดังนี้
1
2
3
4
5

 
phpinfo();
 
?>

สั่ง restart service httpd สักหนึ่งรอบ ด้วยคำสั่ง
1
# service httpd restart

เมื่อทุกอย่างเรียบร้อย ให้ทดสอบเปิด info.php ผ่าน web browser ดูนะครับ ^^
1
http://192.168.10.10/info.php

ก่อนจบเราต้องเพิ่มให้ service httpd ทำงานทุกครั้งที่เปิดเครื่องด้วยคำสั่ง
1
# chkconfig httpd on


รอบหน้าเราจะต่อกันด้วยการทำ https ให้กับ web server ของเรากันต่อ

วันนี้เรามาเรียนรู้วิธีการติดตั้ง Web Server โดยเราจะทำการติดตั้ง apache ให้ทำหน้าที่เป็น Web Server (http) และติดตั้ง mod_ssl เพื่อเอาไว้ใช้ทำ Secure Web Server (https) จากนั้นจะทำการติดตั้ง php และ php extension ต่างๆ เพื่อเอาไว้ใช้กับโปรแกรมที่เขียนด้วย php ซึ่งในบทความนี้ จะไม่ได้พูดถึงการใช้งานภาษา Perl, Python หรือโปรแกรมภาษาอื่นๆ หากผู้อ่านสนใจ ก็ตามไปศึกษาจากแหล่งข้อมูลอื่นๆ กันตามสะดวก และถ้าหากมีโอกาสในคราวหน้าก็อยากจะลองใช้ nginx ซึ่งเป็น Web Server ที่ผู้คนสนใจกันเยอะมากอีกตัวหนึ่ง อ่ะเริ่มกันเลยครับ
เริ่มจากติดตั้ง httpd และ mod_ssl โดยใช้คำสั่ง

1
# yum install httpd mod_ssl

ระบบจะแสดงข้อมูลและแพกเก็จต่างๆที่ต้องติดตั้ง ให้กด y เพื่อทำการติดตั้งต่อไป
เปิดไฟล์ /etc/httpd/conf/httpd.conf และเพิ่มหรือแก้ไขบรรทัด ServerName ลงไป โดยให้ใส่เป็นชื่อของเซอเวอร์ของเราลงไป
1
# nano /etc/httpd/conf/httpd.conf


จากนั้นทำการ start service httpd ด้วยคำสั่ง
1
# service httpd start


ทดสอบเปิดเว็บไซต์ดูได้เลย
1
http://192.168.10.10/

เมื่อติดตั้ง apache เรียบร้อยแล้วเราก็มาติดตั้ง php และ php extension ต่างๆกันต่อ อย่างแรกใช้คำสั่ง yum list php* เพื่อดูว่ามี php extension อะไรบ้างที่น่าสนใจ ให้จดหรือจำชื่อของ extension ต่างๆที่ต้องการเอาไว้
1
# yum list php*

ทำการติดตั้ง php และ php extension ต่างๆ ที่ต้องการ
1
# yum install php-common php-cli php-devel php-mysql php-gd php-imap php-mbstring php-mhash php-pear php-xml php-xmlrpc

ต่อไปทำการสร้างไฟล์ info.php ในโพลเดอร์ /var/www/html/ ด้วยคำสั่ง
1
# nano /var/www/html/info.php
และพิมพ์ Source Code ของ PHP ลงไปดังนี้
1
2
3
4
5

 
phpinfo();
 
?>

สั่ง restart service httpd สักหนึ่งรอบ ด้วยคำสั่ง
1
# service httpd restart

เมื่อทุกอย่างเรียบร้อย ให้ทดสอบเปิด info.php ผ่าน web browser ดูนะครับ ^^
1
http://192.168.10.10/info.php

ก่อนจบเราต้องเพิ่มให้ service httpd ทำงานทุกครั้งที่เปิดเครื่องด้วยคำสั่ง
1
# chkconfig httpd on


รอบหน้าเราจะต่อกันด้วยการทำ https ให้กับ web server ของเรากันต่อ


บทความนี้จะแนะนำการติดตั้งและใช้งาน CentOS http://www.centos.org/ ซึ่งเป็น Linux สาย Redhat ตัวหนึ่ง ในการนำมาใช้ทำเป็น Server โดยจะแบ่งเนื้อหาออกเป็นตอนๆ เพื่อความสะดวกของคนเขียน (ผมเอง) โดยจะมีเนื้อหาทั้งหมดคราวๆ ตามหัวข้อดังนี้

* CentOS Minimal Installation
* Web Server: Apache and PHP
* Secure Web Server : Apache & Mod SSL
* Database: MySQL & PHP MySQL Extension
* Database: Oracle & PHP OCI8 Extension
* Mail Server: Postfix
* DNS Server: BIND
* FTP Server: ProFTPD
* User & Group Management


บทความนี้จะแนะนำการติดตั้งและใช้งาน CentOS http://www.centos.org/ ซึ่งเป็น Linux สาย Redhat ตัวหนึ่ง ในการนำมาใช้ทำเป็น Server โดยจะแบ่งเนื้อหาออกเป็นตอนๆ เพื่อความสะดวกของคนเขียน (ผมเอง) โดยจะมีเนื้อหาทั้งหมดคราวๆ ตามหัวข้อดังนี้

* CentOS Minimal Installation
* Web Server: Apache and PHP
* Secure Web Server : Apache & Mod SSL
* Database: MySQL & PHP MySQL Extension
* Database: Oracle & PHP OCI8 Extension
* Mail Server: Postfix
* DNS Server: BIND
* FTP Server: ProFTPD
* User & Group Management