Linux Windows CentOS Web Server DNS PHP MySql
แสดงบทความที่มีป้ายกำกับ linux แสดงบทความทั้งหมด

วันพฤหัสบดีที่ 1 สิงหาคม พ.ศ. 2556

TOP 5 Best Linux OS

As part of the contest that was conducted a while back, I got around 200 responses from the geeky readers who choose their favorite Linux distributions.

Based on this data, the top spot in the best Linux distribution list goes to…

Ubuntu

My personal favorite was Ubuntu for desktop (#1 in this list) and Red Hat for servers (#5 in this list).

If you are new to any of the distros listed in the top 5, read the rest of the article to understand little bit more about those distros and find out whether your favorite Linux distribution made it in the top 5.


Linux Distro Review
Fig: Favorite Linux Distribution Voting Results

1. Ubuntu

Ubuntu 8.04 LTS Desktop
Like most of you, Ubuntu is my #1 choice for desktop Linux. I use it both at home and work. Ubuntu is the #1 in the Linux desktop market and some use Ubuntu for the servers also. Ubuntu offers the following three editions.
  • Ubuntu Desktop Edition 
  • Ubuntu Server Edition 
  • Ubuntu Notebook Remix
Additional Details:


2. Debian

Debian 4.0r8, or etch
Debian is also called as Debian GNU/Linux, as most of the basic OS tools comes from the GNU Project. Lot of other famous distributions are based on Debian, which includes our #1 distro Ubuntu and many others — such as Knoppix, Linspire, Damn Small Linux etc.,

Additional Details:


Read more about Debian Distribution at wikipedia.

3. Fedora

Fedora 10 Server Edition


Fedora is sponsored by Red Hat. If you are interested in experimenting with the the leading technologies, you should use fedora, as the release cycle is very short and fedora tends to include the latest technology software/packages in it’s distribution.

Additional Details:

Read more about Fedora Distribution at wikipedia.

4. CentOS

CentOS 5 Linux Distro
If your organization does not want to spend money on purchasing Red Hat support, but still want all the benefits of the red-hat distribution, this is obviously the best choice, as this is totally based on the red-hat enterprise Linux.

As you can imagine the Nort American Enterprise Linux vendor mentioned in the quote below is Red Hat.

From the CentOS website: CentOS 2, 3, and 4 are built from publically available open source SRPMS provided by a prominent North American Enterprise Linux vendor. CentOS is designed for people who need an enterprise class OS without the cost or support of the prominent North American Enterprise Linux vendor.

Additional Details:
Read more about CentOS Distribution at wikipedia

5. Red Hat


Linux Red Hat 4 Enterprise Linux for Server
This is my favorite server distribution. If an organization doesn’t mind spending dollars on purchasing the red-hat support, this is always my #1 recommendation to any organization who runs mission critical applications.
On a side note, one of the reason I like Red Hat Linux for mission critical production application is that Red Hat tends to take some of the new features from Fedora, which is well tested by the community.

Additional Details:
Read more about Red Hat Distribution at wikipedia.

TOP 5 Best Linux OS

As part of the contest that was conducted a while back, I got around 200 responses from the geeky readers who choose their favorite Linux distributions.

Based on this data, the top spot in the best Linux distribution list goes to…

Ubuntu

My personal favorite was Ubuntu for desktop (#1 in this list) and Red Hat for servers (#5 in this list).

If you are new to any of the distros listed in the top 5, read the rest of the article to understand little bit more about those distros and find out whether your favorite Linux distribution made it in the top 5.


Linux Distro Review
Fig: Favorite Linux Distribution Voting Results

1. Ubuntu

Ubuntu 8.04 LTS Desktop
Like most of you, Ubuntu is my #1 choice for desktop Linux. I use it both at home and work. Ubuntu is the #1 in the Linux desktop market and some use Ubuntu for the servers also. Ubuntu offers the following three editions.
  • Ubuntu Desktop Edition 
  • Ubuntu Server Edition 
  • Ubuntu Notebook Remix
Additional Details:


2. Debian

Debian 4.0r8, or etch
Debian is also called as Debian GNU/Linux, as most of the basic OS tools comes from the GNU Project. Lot of other famous distributions are based on Debian, which includes our #1 distro Ubuntu and many others — such as Knoppix, Linspire, Damn Small Linux etc.,

Additional Details:


Read more about Debian Distribution at wikipedia.

3. Fedora

Fedora 10 Server Edition


Fedora is sponsored by Red Hat. If you are interested in experimenting with the the leading technologies, you should use fedora, as the release cycle is very short and fedora tends to include the latest technology software/packages in it’s distribution.

Additional Details:

Read more about Fedora Distribution at wikipedia.

4. CentOS

CentOS 5 Linux Distro
If your organization does not want to spend money on purchasing Red Hat support, but still want all the benefits of the red-hat distribution, this is obviously the best choice, as this is totally based on the red-hat enterprise Linux.

As you can imagine the Nort American Enterprise Linux vendor mentioned in the quote below is Red Hat.

From the CentOS website: CentOS 2, 3, and 4 are built from publically available open source SRPMS provided by a prominent North American Enterprise Linux vendor. CentOS is designed for people who need an enterprise class OS without the cost or support of the prominent North American Enterprise Linux vendor.

Additional Details:
Read more about CentOS Distribution at wikipedia

5. Red Hat


Linux Red Hat 4 Enterprise Linux for Server
This is my favorite server distribution. If an organization doesn’t mind spending dollars on purchasing the red-hat support, this is always my #1 recommendation to any organization who runs mission critical applications.
On a side note, one of the reason I like Red Hat Linux for mission critical production application is that Red Hat tends to take some of the new features from Fedora, which is well tested by the community.

Additional Details:
Read more about Red Hat Distribution at wikipedia.

วันอังคารที่ 30 กรกฎาคม พ.ศ. 2556


Here is a basic guide to install Centos 6 ( for beginners ) . Before proceeding with the installation, please make sure you have a compatible hardware resource , Centos installation CD/DVD. ( you candownload a fresh iso from http://www.centos.org/modules/tinycontent/index.php?id=30 )
let’s start ..
Put the Centos CD/DVD into the CD/DVD Drive .

» press F12 or Delete Key( Depends upon your motherboard / Brand ) . Select CD-ROM Drive

bootmenu
[or]
» You can change first boot device to CD-ROM in Bios Setup ( Mostly F2 key for Bios setup ).


biossetup


Installation will start now. ( Follow the Screenshots and steps ).

centos6-step-1

centos6-step-1

Step 1 » The Setup starts now . Choose “Install or upgrade an existing system” and press Enter.
Step 2 » It will ask your confirmation for testing your CD / DVD media . Just pressSkip if you are using newly burned DVD ( Better test your DVD if it is old one).
Step 3 » Installation will starts now . Press Next .
Step 4 » choose language (English) and press Next .
Step 5 » Again choose keyboard (U.S. English) and press Next .
Step 6 » Now choose Storage device type . choose “Basic Storage Devices” and pressNext ( For advanced storage like SAN , NAS , ISCSI , you need to choose second option) .
Step 7 » It will show warning for using new hard disk . Press “yes, discard any data “ .
Step 8 » Type hostname and press Next .
Step 9 » Choose Time zone and press Next .
Step 10 » Type root password and press Next .
Step 11 » Now choose “Use All Space” and press Next ( it will use entire Disk for CentOS) .
Step 12 » It will show warning to creating partition structure on your hard disk . Press “write changes to disk” .
Step 13 » Now choose minimal in the list ( Server Type : we can configure later ) and press Next .
Step 14 » It will start installing centos after checking dependencies .
Step 15 » After completing installation press Reboot .
Step 16 »Now you have successfully installed Centos . Type username “root” and password ( type root password) and press Enter.


Here is a basic guide to install Centos 6 ( for beginners ) . Before proceeding with the installation, please make sure you have a compatible hardware resource , Centos installation CD/DVD. ( you candownload a fresh iso from http://www.centos.org/modules/tinycontent/index.php?id=30 )
let’s start ..
Put the Centos CD/DVD into the CD/DVD Drive .

» press F12 or Delete Key( Depends upon your motherboard / Brand ) . Select CD-ROM Drive

bootmenu
[or]
» You can change first boot device to CD-ROM in Bios Setup ( Mostly F2 key for Bios setup ).


biossetup


Installation will start now. ( Follow the Screenshots and steps ).

centos6-step-1

centos6-step-1

Step 1 » The Setup starts now . Choose “Install or upgrade an existing system” and press Enter.
Step 2 » It will ask your confirmation for testing your CD / DVD media . Just pressSkip if you are using newly burned DVD ( Better test your DVD if it is old one).
Step 3 » Installation will starts now . Press Next .
Step 4 » choose language (English) and press Next .
Step 5 » Again choose keyboard (U.S. English) and press Next .
Step 6 » Now choose Storage device type . choose “Basic Storage Devices” and pressNext ( For advanced storage like SAN , NAS , ISCSI , you need to choose second option) .
Step 7 » It will show warning for using new hard disk . Press “yes, discard any data “ .
Step 8 » Type hostname and press Next .
Step 9 » Choose Time zone and press Next .
Step 10 » Type root password and press Next .
Step 11 » Now choose “Use All Space” and press Next ( it will use entire Disk for CentOS) .
Step 12 » It will show warning to creating partition structure on your hard disk . Press “write changes to disk” .
Step 13 » Now choose minimal in the list ( Server Type : we can configure later ) and press Next .
Step 14 » It will start installing centos after checking dependencies .
Step 15 » After completing installation press Reboot .
Step 16 »Now you have successfully installed Centos . Type username “root” and password ( type root password) and press Enter.


FTP – File transfer protocol is used to transfer files from one host to another over TCP . Configuring ftp server on linux is safe and secure .
In this article we can see how to configure ftp server on centos 6 . please follow the steps.


Configuring ftp server on Centos 6:

Step 1 » Vsftpd is a lightweight FTP server package for Centos (linux) . Startinstalling package by issuing below command.

[root@leela ~]# yum -y install vsftpd

Step 2 » After installation, Open the file /etc/vsftpd/vsftpd.conf which is the config file for vsftpd ( I mean FTP server ) .Find the below line Replace YES to NO to disable anonymous login ( Login without username and password ). Uncomment the below line to disable chroot access ( optional )

Step 3 » Create a folder where you want to store FTP data. In my case i’m going to create in / ( root folder ) like below .
[root@leela ~]# mkdir /ftp
Step 4 » Now start creating users for accessing ftp server .

[root@leela ~]# useradd -d /ftp/krizna krizna
[root@leela ~]# passwd krizna
Changing password for user krizna.
New password:


You just created username krizna with home directory /ftp/krizna .

Step 5 » Start vsftpd service by issuing the below command.


[root@leela ~]# service vsftpd start
and type this below command to start ftp server service automatically while booting.

[root@leela ~]# chkconfig --levels 235 vsftpd on
Step 6 » That’s it, Now we can check the FTP access .Create some files in /ftp/krizna folder

[root@leela ~]# touch /ftp/krizna/test
[root@leela ~]# touch /ftp/krizna/test1
[root@leela ~]# touch /ftp/krizna/test2

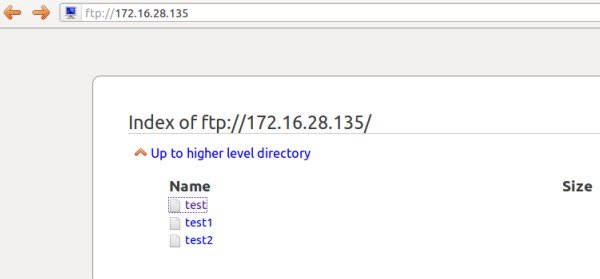
Now open ftp path in remote machine browser ftp://ftp-server-IP ( ftp://172.16.28.135 ). You can see the created files after authentication.

configure ftp server on centos 6
You can use Filezilla or winscp tools to upload/download files from FTP server.


Troubleshooting :
If you not able to connect ftp server , Disable the firewall ( iptables ) and selinux service on your ftp server .

Disable firewall ( Iptables ) »
[root@leela ~]# service iptables stop
[root@leela ~]# chkconfig iptables off

Disable Selinux » open the file /etc/selinux/config and find the line

SELINUX=enforcing
and replace with
SELINUX=disabled

now reboot the server and try again.


FTP – File transfer protocol is used to transfer files from one host to another over TCP . Configuring ftp server on linux is safe and secure .
In this article we can see how to configure ftp server on centos 6 . please follow the steps.


Configuring ftp server on Centos 6:

Step 1 » Vsftpd is a lightweight FTP server package for Centos (linux) . Startinstalling package by issuing below command.

[root@leela ~]# yum -y install vsftpd

Step 2 » After installation, Open the file /etc/vsftpd/vsftpd.conf which is the config file for vsftpd ( I mean FTP server ) .Find the below line Replace YES to NO to disable anonymous login ( Login without username and password ). Uncomment the below line to disable chroot access ( optional )

Step 3 » Create a folder where you want to store FTP data. In my case i’m going to create in / ( root folder ) like below .
[root@leela ~]# mkdir /ftp
Step 4 » Now start creating users for accessing ftp server .

[root@leela ~]# useradd -d /ftp/krizna krizna
[root@leela ~]# passwd krizna
Changing password for user krizna.
New password:


You just created username krizna with home directory /ftp/krizna .

Step 5 » Start vsftpd service by issuing the below command.


[root@leela ~]# service vsftpd start
and type this below command to start ftp server service automatically while booting.

[root@leela ~]# chkconfig --levels 235 vsftpd on
Step 6 » That’s it, Now we can check the FTP access .Create some files in /ftp/krizna folder

[root@leela ~]# touch /ftp/krizna/test
[root@leela ~]# touch /ftp/krizna/test1
[root@leela ~]# touch /ftp/krizna/test2

Now open ftp path in remote machine browser ftp://ftp-server-IP ( ftp://172.16.28.135 ). You can see the created files after authentication.

configure ftp server on centos 6
You can use Filezilla or winscp tools to upload/download files from FTP server.


Troubleshooting :
If you not able to connect ftp server , Disable the firewall ( iptables ) and selinux service on your ftp server .

Disable firewall ( Iptables ) »
[root@leela ~]# service iptables stop
[root@leela ~]# chkconfig iptables off

Disable Selinux » open the file /etc/selinux/config and find the line

SELINUX=enforcing
and replace with
SELINUX=disabled

now reboot the server and try again.


It is used to Connect to the remote system through secure shell. It give you a copy of remote shell on your desktop.You can also create password less login to the remote system with the help of PUBLIC/PRIVATE keys.

1.For installing SSH open the terminal and type :-


# su          <--- nbsp="" span="" style="box-sizing: border-box;" to="">become root and enter the password>
# yum install openssh-server


2. After the completion of Installation you have to on the sshd service and start the service.

# chkconfig sshd on
# service sshd restart


3. Now you have to ssh from other machine to your machine to test it. that ssh service working properly.


As you can see I am successfully able to login to my machine from ssh. That's it enjoy.


It is used to Connect to the remote system through secure shell. It give you a copy of remote shell on your desktop.You can also create password less login to the remote system with the help of PUBLIC/PRIVATE keys.

1.For installing SSH open the terminal and type :-


# su          <--- nbsp="" span="" style="box-sizing: border-box;" to="">become root and enter the password>
# yum install openssh-server


2. After the completion of Installation you have to on the sshd service and start the service.

# chkconfig sshd on
# service sshd restart


3. Now you have to ssh from other machine to your machine to test it. that ssh service working properly.


As you can see I am successfully able to login to my machine from ssh. That's it enjoy.

1. ls command

Feature: list directory contents.
Common Usage example:
- List all files and folder with permission/human readable.


[root@localhost ~]# ls -lah
total 195M
dr-xr-x—. 31 root root 4.0K Mar 24 09:31 .
dr-xr-xr-x. 24 root root 4.0K Mar 24 02:24 ..
-rw——-. 1 root root 2.7K Jan 4 10:47 anaconda-ks.cfg
-rw——-. 1 root root 15K Mar 25 10:53 .bash_history
-rw-r–r–. 1 root root 18 May 20 2009 .bash_logout
-rw-r–r–. 1 root root 176 May 20 2009 .bash_profile
-rw-r–r–. 1 root root 176 Sep 22 2004 .bashrc
drwxr-xr-x. 2 root root 4.0K Jan 4 11:27 .cache
drwxr-xr-x. 4 root root 4.0K Jan 4 04:15 .config
-rw-r–r–. 1 root root 100 Sep 22 2004 .cshrc
drwx——. 3 root root 4.0K Jan 4 04:15 .dbus
drwxr-xr-x. 4 root root 4.0K Jan 13 09:43 Desktop
drwxr-xr-x. 2 root root 4.0K Jan 4 04:15 Documents
drwxr-xr-x. 2 root root 4.0K Jan 4 04:15 Downloads
drwx——. 3 root root 4.0K Jan 9 10:33 .dropbox
-rw-r–r–. 1 root root 15K Nov 5 2012 epel-release-6-8.noarch.rpm
-rw-r–r–. 1 root root 15K Nov 5 2012 epel-release-6-8.noarch.rpm.1
-rw-r–r–. 1 root root 15K Nov 5 2012 epel-release-6-8.noarch.rpm.2
-rw——-. 1 root root 16 Jan 4 04:15 .esd_auth
drwx——. 4 root root 4.0K Mar 24 02:27 .gconf
drwx——. 2 root root 4.0K Mar 25 10:22 .gconfd
drwx——. 6 root root 4.0K Jan 15 07:17 .gnome2
drwx——. 2 root root 4.0K Jan 15 07:17 .gnome2_private
drwxr-xr-x. 3 root root 4.0K Jan 4 04:15 .gnote
drwx——. 2 root root 4.0K Mar 24 02:27 .gnupg
drwxr-xr-x. 2 root root 4.0K Jan 4 04:15 .gstreamer-0.10
-rw-r–r–. 1 root root 107 Mar 24 02:55 .gtk-bookmarks
dr-x——. 2 root root 0 Mar 24 02:27 .gvfs
-rw——-. 1 root root 3.4K Mar 24 02:27 .ICEauthority
-rw-r–r–. 1 root root 40K Jan 4 10:47 install.log
-rw-r–r–. 1 root root 9.1K Jan 4 10:44 install.log.syslog
-rw-r–r–. 1 root root 3.5M Feb 26 03:03 kamailio-3.3.4-1.1.x86_64.rpm
-rw-r–r–. 1 root root 54K Feb 26 03:03 kamailio-mysql-3.3.4-1.1.x86_64.rpm
drwxr-xr-x. 3 root root 4.0K Jan 4 04:15 .local
drwxr-xr-x. 6 root root 4.0K Jan 5 09:17 lynis-1.3.0
-rw-r–r–. 1 root root 117K Dec 25 2011 lynis-1.3.0.tar.gz
-rwxr-xr-x. 1 root root 122M Dec 27 07:16 ManageEngine_NetFlowAnalyzer_HighPerf_9800_64bit.bin
-rwxr-xr-x. 1 root root 69M Dec 29 03:59 ManageEngine_OpManager_64bit.bin
drwxr-xr-x. 4 root root 4.0K Jan 15 07:17 .mozilla
drwxr-xr-x. 2 root root 4.0K Jan 4 04:15 Music
-rw——-. 1 root root 299 Mar 19 09:00 .mysql_history
drwxr-xr-x. 2 root root 4.0K Jan 4 04:15 .nautilus
drwxr-xr-x. 2 root root 4.0K Jan 4 04:15 Pictures
drwxr—–. 3 root root 4.0K Jan 4 11:44 .pki
drwxr-xr-x. 2 root root 4.0K Jan 4 04:15 Public
drwx——. 2 root root 4.0K Jan 4 04:15 .pulse
-rw——-. 1 root root 256 Jan 4 04:15 .pulse-cookie
-rw——-. 1 root root 218 Jan 4 04:16 .recently-used.xbel
-rw——-. 1 root root 1.0K Mar 24 09:31 .rnd
-rw-r–r–. 1 root root 13K Nov 12 2010 rpmforge-release-0.5.2-2.el6.rf.x86_64.rpm
-rw-r–r–. 1 root root 13K Nov 12 2010 rpmforge-release-0.5.2-2.el6.rf.x86_64.rpm.1
drwxr-xr-x. 2 root root 4.0K Jan 6 10:39 server
drwxr-xr-x. 2 root root 4.0K Jan 4 04:15 .spice-vdagent
drwx——. 2 root root 4.0K Jan 4 04:15 .ssh
-rw-r–r–. 1 root root 129 Dec 3 2004 .tcshrc
drwxr-xr-x. 2 root root 4.0K Jan 4 04:15 Templates
drwxr-xr-x. 2 root root 4.0K Jan 4 04:15 Videos
-rw-r–r–. 1 root root 1.4K Jan 28 23:25 vpd.properties
-rw-r–r–. 1 root root 246K Jan 28 11:12 wget-log
[root@localhost ~]#

2. cd command

Feature: Change the current directory to another.
Common Usage example:


[root@localhost ~]# cd /var
[root@localhost var]#[root@localhost var]# cd ..
[root@localhost /]#[root@localhost /]# cd ~
[root@localhost ~]#

3. pwd command

Feature: print name of current/working directory
Common Usage example:


[root@localhost html]# pwd
/var/www/html
[root@localhost html]#

4. df command

Feature: disk space usage on your system.Common Usage example:


[root@localhost html]# df -h
Filesystem Size Used Avail Use% Mounted on
/dev/sda2 9.7G 3.9G 5.3G 42% /
tmpfs 495M 160K 495M 1% /dev/shm
/dev/sda1 291M 56M 221M 20% /boot
[root@localhost html]#

5. top command

Feature: display top Linux services which consume RAM and CPU.
Common Usage example:


[root@localhost /]# top
top – 03:23:05 up 51 min, 3 users, load average: 0.02, 0.02, 0.00
Tasks: 187 total, 1 running, 186 sleeping, 0 stopped, 0 zombie
Cpu(s): 0.7%us, 0.7%sy, 0.0%ni, 98.7%id, 0.0%wa, 0.0%hi, 0.0%si, 0.0%st
Mem: 1012548k total, 829728k used, 182820k free, 53620k buffers
Swap: 2031608k total, 0k used, 2031608k free, 382916k cached
PID USER PR NI VIRT RES SHR S %CPU %MEM TIME+ COMMAND
278 root 20 0 0 0 0 S 0.3 0.0 0:01.40 scsi_eh_1
2993 kevin.ng 20 0 398m 15m 12m S 0.3 1.6 0:17.11 vmtoolsd
3523 root 20 0 402m 15m 12m S 0.3 1.6 0:05.88 vmtoolsd
3694 root 20 0 97868 4160 3228 S 0.3 0.4 0:00.25 sshd
4040 root 20 0 15032 1300 952 R 0.3 0.1 0:00.02 top
1 root 20 0 19352 1536 1228 S 0.0 0.2 0:01.69 init
2 root 20 0 0 0 0 S 0.0 0.0 0:00.00 kthreadd
3 root RT 0 0 0 0 S 0.0 0.0 0:00.00 migration/0
4 root 20 0 0 0 0 S 0.0 0.0 0:00.15 ksoftirqd/0
5 root RT 0 0 0 0 S 0.0 0.0 0:00.00 migration/0
6 root RT 0 0 0 0 S 0.0 0.0 0:00.02 watchdog/0
7 root 20 0 0 0 0 S 0.0 0.0 0:03.95 events/0
8 root 20 0 0 0 0 S 0.0 0.0 0:00.00 cgroup
9 root 20 0 0 0 0 S 0.0 0.0 0:00.00 khelper
10 root 20 0 0 0 0 S 0.0 0.0 0:00.00 netns
11 root 20 0 0 0 0 S 0.0 0.0 0:00.00 async/mgr
12 root 20 0 0 0 0 S 0.0 0.0 0:00.00 pm

6. rpm command

Feature: install/uninstall a package and manage package/software on Linux System.Common Usage example:


[root@localhost ~]# rpm -ivh epel-release-6-8.noarch.rpm
Preparing… ########################################### [100%]
package epel-release-6-8.noarch is already installed
[root@localhost ~]#[root@localhost ~]# rpm -e remi-release-6-2.el6.remi.noarch
List all packages on Linux System


[root@localhost ~]# rpm -qa

7. yum command

Feature: is an interactive, rpm based, package manage and perform system updates, including dependency based on repository.

Common Usage example:


[root@localhost ~]# yum install php-cli
Loaded plugins: fastestmirror, refresh-packagekit, security
Loading mirror speeds from cached hostfile
* base: virror.hanoilug.org
* epel: ftp.cuhk.edu.hk
* extras: virror.hanoilug.org
* updates: repo.cloudhosting.com.hk
Setting up Install Process
Package php-cli-5.3.3-22.el6.x86_64 already installed and latest version
Nothing to do
[root@localhost ~]#[root@localhost ~]# yum erase php-cli
Loaded plugins: fastestmirror, refresh-packagekit, security
Setting up Remove Process
Resolving Dependencies
–> Running transaction check
—> Package php-cli.x86_64 0:5.3.3-22.el6 will be erased
–> Processing Dependency: php-cli(x86-64) = 5.3.3-22.el6 for package: php-5.3.3 -22.el6.x86_64
–> Running transaction check
—> Package php.x86_64 0:5.3.3-22.el6 will be erased
–> Finished Dependency ResolutionDependencies Resolved================================================================================
Package Arch Version Repository Size
================================================================================
Removing:
php-cli x86_64 5.3.3-22.el6 @base 6.2 M
Removing for dependencies:
php x86_64 5.3.3-22.el6 @base 3.5 MTransaction Summary
================================================================================
Remove 2 Package(s)
Installed size: 9.7 M
Is this ok [y/N]: y
Downloading Packages:
Running rpm_check_debug
Running Transaction Test
Transaction Test Succeeded
Running Transaction
Warning: RPMDB altered outside of yum.
Erasing : php-5.3.3-22.el6.x86_64 1/2
Erasing : php-cli-5.3.3-22.el6.x86_64 2/2
Verifying : php-cli-5.3.3-22.el6.x86_64 1/2
Verifying : php-5.3.3-22.el6.x86_64 2/2Removed:
php-cli.x86_64 0:5.3.3-22.el6Dependency Removed:
php.x86_64 0:5.3.3-22.el6Complete!
[root@localhost ~]#

8. vi command

Feature: edit text file on Linux System.
Common Usage example:


[root@localhost ~]# vi filetext

9. cat command

Feature: view text file on Linux System.
Common Usage example:


[root@localhost ~]# cat filetext
hello this is text file
[root@localhost ~]#

10. tar command

Feature: using to create tar archive or extract tar archive
Common Usage example:


Create backup.tar file for /var
tar cvf backup.tar /var

Extract a tar file
tar -xzvf backup.tar

1. ls command

Feature: list directory contents.
Common Usage example:
- List all files and folder with permission/human readable.


[root@localhost ~]# ls -lah
total 195M
dr-xr-x—. 31 root root 4.0K Mar 24 09:31 .
dr-xr-xr-x. 24 root root 4.0K Mar 24 02:24 ..
-rw——-. 1 root root 2.7K Jan 4 10:47 anaconda-ks.cfg
-rw——-. 1 root root 15K Mar 25 10:53 .bash_history
-rw-r–r–. 1 root root 18 May 20 2009 .bash_logout
-rw-r–r–. 1 root root 176 May 20 2009 .bash_profile
-rw-r–r–. 1 root root 176 Sep 22 2004 .bashrc
drwxr-xr-x. 2 root root 4.0K Jan 4 11:27 .cache
drwxr-xr-x. 4 root root 4.0K Jan 4 04:15 .config
-rw-r–r–. 1 root root 100 Sep 22 2004 .cshrc
drwx——. 3 root root 4.0K Jan 4 04:15 .dbus
drwxr-xr-x. 4 root root 4.0K Jan 13 09:43 Desktop
drwxr-xr-x. 2 root root 4.0K Jan 4 04:15 Documents
drwxr-xr-x. 2 root root 4.0K Jan 4 04:15 Downloads
drwx——. 3 root root 4.0K Jan 9 10:33 .dropbox
-rw-r–r–. 1 root root 15K Nov 5 2012 epel-release-6-8.noarch.rpm
-rw-r–r–. 1 root root 15K Nov 5 2012 epel-release-6-8.noarch.rpm.1
-rw-r–r–. 1 root root 15K Nov 5 2012 epel-release-6-8.noarch.rpm.2
-rw——-. 1 root root 16 Jan 4 04:15 .esd_auth
drwx——. 4 root root 4.0K Mar 24 02:27 .gconf
drwx——. 2 root root 4.0K Mar 25 10:22 .gconfd
drwx——. 6 root root 4.0K Jan 15 07:17 .gnome2
drwx——. 2 root root 4.0K Jan 15 07:17 .gnome2_private
drwxr-xr-x. 3 root root 4.0K Jan 4 04:15 .gnote
drwx——. 2 root root 4.0K Mar 24 02:27 .gnupg
drwxr-xr-x. 2 root root 4.0K Jan 4 04:15 .gstreamer-0.10
-rw-r–r–. 1 root root 107 Mar 24 02:55 .gtk-bookmarks
dr-x——. 2 root root 0 Mar 24 02:27 .gvfs
-rw——-. 1 root root 3.4K Mar 24 02:27 .ICEauthority
-rw-r–r–. 1 root root 40K Jan 4 10:47 install.log
-rw-r–r–. 1 root root 9.1K Jan 4 10:44 install.log.syslog
-rw-r–r–. 1 root root 3.5M Feb 26 03:03 kamailio-3.3.4-1.1.x86_64.rpm
-rw-r–r–. 1 root root 54K Feb 26 03:03 kamailio-mysql-3.3.4-1.1.x86_64.rpm
drwxr-xr-x. 3 root root 4.0K Jan 4 04:15 .local
drwxr-xr-x. 6 root root 4.0K Jan 5 09:17 lynis-1.3.0
-rw-r–r–. 1 root root 117K Dec 25 2011 lynis-1.3.0.tar.gz
-rwxr-xr-x. 1 root root 122M Dec 27 07:16 ManageEngine_NetFlowAnalyzer_HighPerf_9800_64bit.bin
-rwxr-xr-x. 1 root root 69M Dec 29 03:59 ManageEngine_OpManager_64bit.bin
drwxr-xr-x. 4 root root 4.0K Jan 15 07:17 .mozilla
drwxr-xr-x. 2 root root 4.0K Jan 4 04:15 Music
-rw——-. 1 root root 299 Mar 19 09:00 .mysql_history
drwxr-xr-x. 2 root root 4.0K Jan 4 04:15 .nautilus
drwxr-xr-x. 2 root root 4.0K Jan 4 04:15 Pictures
drwxr—–. 3 root root 4.0K Jan 4 11:44 .pki
drwxr-xr-x. 2 root root 4.0K Jan 4 04:15 Public
drwx——. 2 root root 4.0K Jan 4 04:15 .pulse
-rw——-. 1 root root 256 Jan 4 04:15 .pulse-cookie
-rw——-. 1 root root 218 Jan 4 04:16 .recently-used.xbel
-rw——-. 1 root root 1.0K Mar 24 09:31 .rnd
-rw-r–r–. 1 root root 13K Nov 12 2010 rpmforge-release-0.5.2-2.el6.rf.x86_64.rpm
-rw-r–r–. 1 root root 13K Nov 12 2010 rpmforge-release-0.5.2-2.el6.rf.x86_64.rpm.1
drwxr-xr-x. 2 root root 4.0K Jan 6 10:39 server
drwxr-xr-x. 2 root root 4.0K Jan 4 04:15 .spice-vdagent
drwx——. 2 root root 4.0K Jan 4 04:15 .ssh
-rw-r–r–. 1 root root 129 Dec 3 2004 .tcshrc
drwxr-xr-x. 2 root root 4.0K Jan 4 04:15 Templates
drwxr-xr-x. 2 root root 4.0K Jan 4 04:15 Videos
-rw-r–r–. 1 root root 1.4K Jan 28 23:25 vpd.properties
-rw-r–r–. 1 root root 246K Jan 28 11:12 wget-log
[root@localhost ~]#

2. cd command

Feature: Change the current directory to another.
Common Usage example:


[root@localhost ~]# cd /var
[root@localhost var]#[root@localhost var]# cd ..
[root@localhost /]#[root@localhost /]# cd ~
[root@localhost ~]#

3. pwd command

Feature: print name of current/working directory
Common Usage example:


[root@localhost html]# pwd
/var/www/html
[root@localhost html]#

4. df command

Feature: disk space usage on your system.Common Usage example:


[root@localhost html]# df -h
Filesystem Size Used Avail Use% Mounted on
/dev/sda2 9.7G 3.9G 5.3G 42% /
tmpfs 495M 160K 495M 1% /dev/shm
/dev/sda1 291M 56M 221M 20% /boot
[root@localhost html]#

5. top command

Feature: display top Linux services which consume RAM and CPU.
Common Usage example:


[root@localhost /]# top
top – 03:23:05 up 51 min, 3 users, load average: 0.02, 0.02, 0.00
Tasks: 187 total, 1 running, 186 sleeping, 0 stopped, 0 zombie
Cpu(s): 0.7%us, 0.7%sy, 0.0%ni, 98.7%id, 0.0%wa, 0.0%hi, 0.0%si, 0.0%st
Mem: 1012548k total, 829728k used, 182820k free, 53620k buffers
Swap: 2031608k total, 0k used, 2031608k free, 382916k cached
PID USER PR NI VIRT RES SHR S %CPU %MEM TIME+ COMMAND
278 root 20 0 0 0 0 S 0.3 0.0 0:01.40 scsi_eh_1
2993 kevin.ng 20 0 398m 15m 12m S 0.3 1.6 0:17.11 vmtoolsd
3523 root 20 0 402m 15m 12m S 0.3 1.6 0:05.88 vmtoolsd
3694 root 20 0 97868 4160 3228 S 0.3 0.4 0:00.25 sshd
4040 root 20 0 15032 1300 952 R 0.3 0.1 0:00.02 top
1 root 20 0 19352 1536 1228 S 0.0 0.2 0:01.69 init
2 root 20 0 0 0 0 S 0.0 0.0 0:00.00 kthreadd
3 root RT 0 0 0 0 S 0.0 0.0 0:00.00 migration/0
4 root 20 0 0 0 0 S 0.0 0.0 0:00.15 ksoftirqd/0
5 root RT 0 0 0 0 S 0.0 0.0 0:00.00 migration/0
6 root RT 0 0 0 0 S 0.0 0.0 0:00.02 watchdog/0
7 root 20 0 0 0 0 S 0.0 0.0 0:03.95 events/0
8 root 20 0 0 0 0 S 0.0 0.0 0:00.00 cgroup
9 root 20 0 0 0 0 S 0.0 0.0 0:00.00 khelper
10 root 20 0 0 0 0 S 0.0 0.0 0:00.00 netns
11 root 20 0 0 0 0 S 0.0 0.0 0:00.00 async/mgr
12 root 20 0 0 0 0 S 0.0 0.0 0:00.00 pm

6. rpm command

Feature: install/uninstall a package and manage package/software on Linux System.Common Usage example:


[root@localhost ~]# rpm -ivh epel-release-6-8.noarch.rpm
Preparing… ########################################### [100%]
package epel-release-6-8.noarch is already installed
[root@localhost ~]#[root@localhost ~]# rpm -e remi-release-6-2.el6.remi.noarch
List all packages on Linux System


[root@localhost ~]# rpm -qa

7. yum command

Feature: is an interactive, rpm based, package manage and perform system updates, including dependency based on repository.

Common Usage example:


[root@localhost ~]# yum install php-cli
Loaded plugins: fastestmirror, refresh-packagekit, security
Loading mirror speeds from cached hostfile
* base: virror.hanoilug.org
* epel: ftp.cuhk.edu.hk
* extras: virror.hanoilug.org
* updates: repo.cloudhosting.com.hk
Setting up Install Process
Package php-cli-5.3.3-22.el6.x86_64 already installed and latest version
Nothing to do
[root@localhost ~]#[root@localhost ~]# yum erase php-cli
Loaded plugins: fastestmirror, refresh-packagekit, security
Setting up Remove Process
Resolving Dependencies
–> Running transaction check
—> Package php-cli.x86_64 0:5.3.3-22.el6 will be erased
–> Processing Dependency: php-cli(x86-64) = 5.3.3-22.el6 for package: php-5.3.3 -22.el6.x86_64
–> Running transaction check
—> Package php.x86_64 0:5.3.3-22.el6 will be erased
–> Finished Dependency ResolutionDependencies Resolved================================================================================
Package Arch Version Repository Size
================================================================================
Removing:
php-cli x86_64 5.3.3-22.el6 @base 6.2 M
Removing for dependencies:
php x86_64 5.3.3-22.el6 @base 3.5 MTransaction Summary
================================================================================
Remove 2 Package(s)
Installed size: 9.7 M
Is this ok [y/N]: y
Downloading Packages:
Running rpm_check_debug
Running Transaction Test
Transaction Test Succeeded
Running Transaction
Warning: RPMDB altered outside of yum.
Erasing : php-5.3.3-22.el6.x86_64 1/2
Erasing : php-cli-5.3.3-22.el6.x86_64 2/2
Verifying : php-cli-5.3.3-22.el6.x86_64 1/2
Verifying : php-5.3.3-22.el6.x86_64 2/2Removed:
php-cli.x86_64 0:5.3.3-22.el6Dependency Removed:
php.x86_64 0:5.3.3-22.el6Complete!
[root@localhost ~]#

8. vi command

Feature: edit text file on Linux System.
Common Usage example:


[root@localhost ~]# vi filetext

9. cat command

Feature: view text file on Linux System.
Common Usage example:


[root@localhost ~]# cat filetext
hello this is text file
[root@localhost ~]#

10. tar command

Feature: using to create tar archive or extract tar archive
Common Usage example:


Create backup.tar file for /var
tar cvf backup.tar /var

Extract a tar file
tar -xzvf backup.tar

คนที่พัฒนาระบบงานบน Linux หรือ Unix และเป็นผู้ที่ไม่ชอบย้ายมือออกจากคีย์บอร์ดนั้น ขอแนะนำให้ใ้ช้ Vi Editor แล้วท่านจะไม่ผิดหวัง เนื่องจาก vi นั้นถูกออกแบบมาให้ใช้งาน โดยที่ไม่จำเป็นต้องเอามือออกจากคีย์บอร์ดเลย ไม่เพียงเท่านั้น 10 นิ้วของท่าน จะไม่หลุดออกแป้น a s d f space j k l : เลย แม้แต่ลูกศรขึ้นลง ก็ไม่ได้ใช้ ตัวเลข ก็ไม่ได้ใช้ อยากรู้แล้วใช้ไหมครับ ว่ามันทำงานอย่างไร
vi ประกอบด้วย 2 Mode คือ
  1. Mode command ไว้สำหรับใช้คำสั่ง Mode นี้ เพียงกด Esc ก็จะเข้าสู่ Mode command อัตโนมัติ (คิดอะไรไม่ออก กด Esc ลูกเดียว)
  2. Mode การพิมพ์ ไว้สำหรับเพิ่มข้อมูล เลื่อน Cursor ต่าง ๆ แต่เราต้องใช้ Command ก่อน เช่น หากต้องการเพิ่มอักษร ต้องสั่ง I (Insert) เสียก่อน และเมื่อพิมพ์จะเป็นการแทรกข้อความอัตโนมัติ
การเลื่อนทิศทาง (Motivation) 
สังเกตุนะครับ มือจะไม่ขยับไปใช้ ลูกศร ขึ้นลง เลย ทำให้ทำงานได้เร็วขึ้น
  • h = เลื่อนไปทางซ้าย
  • l = เลื่อนไปทางขวา
  • j = เลื่อนลง
  • k = เลื่อนขึ้น
  • หาก พิมพ์ 8l = เลื่อนไปทางขวา 8 ตัวอักษร
  • w , W = เลื่อนไปทางขวา 1 คำ เช่น this is test เมื่อกด w จะเลื่อน Cursor ไป 1 word Cursor จะไปยืนอยู่ที่ this is test เป็นต้น
  • { = เลื่อนไปยังต้น Paragraph
  • } = เลื่อนไปยังท้าย Paragraph
  • :หมายเลขบรรทัด = เลื่อนไปยังบรรทัดที่ต้องการ เช่น :10 หมายถึงไปบรรทัดที่ 10 เป็นต้น
  • $ = ไปตัวอักษรท้ายสุดของบรรทัด
  • 0 = ไปตัวอักษรตัวแรกสุด ของบรรทัด
การกระทำการ (Operator)
  • i = เพิ่มตัวอักษร (insert) ใช้งาน โดยพิมพ์ i แล้วพิมพ์ต่อได้เลย
  • I = เพิ่มตัวอักษรต้นบรรทัด
  • x = ลบตัวษรทีละ 1 ตัว
  • 10x = ลบตัวอักษร 10 ตัว
  • dw = ลบทั้งคำ
  • dd = ลบทั้งบรรทัด
  • yy = yank หมายถึง Copy ทั้งบรรทัด
  • p = วาง (Paste) วางบรรทัดล่างจาก Cursor อยู่
  • P = วาง (Paste) วางแทรกบรรทัดปัจจุบัน
การจัดการเกี่ยวกับไฟล์
  • :w ชื่อไฟล์ = save ไฟล ์ด้วยชื่อที่กำหนด
  • :wq = save ไฟล์ และออกจาก vi (Quit)
  • :q! = ออกจาก vi โดยไม่ Save
  • :set
    • set nu = สั่งให้ vi แสดงหมายเลขบรรทัด
    • set ic = สั่งให้เวลา Search ไม่ดูการค้น ตัวเล็ก ตัวใหญ่ ใด ๆ (Ignore Case)
    • set nu ic สั่งให้ทำงานทั้ง 2 แบบ
ลอง Telnet แล้วไปของพิมพ์เล่น ๆ ดูนะครับ ทางด้านบนนั้น เป็นเพียงแค่ความสามารถเพียงนิดเดียวของ Vi ครับ หวังว่าหลายคนที่มองหา Editor ฟรี ๆ ความสามารถสูง ๆ ที่พร้อมใช้ังานอยู่ใน Server อยู่แล้วครับ

คนที่พัฒนาระบบงานบน Linux หรือ Unix และเป็นผู้ที่ไม่ชอบย้ายมือออกจากคีย์บอร์ดนั้น ขอแนะนำให้ใ้ช้ Vi Editor แล้วท่านจะไม่ผิดหวัง เนื่องจาก vi นั้นถูกออกแบบมาให้ใช้งาน โดยที่ไม่จำเป็นต้องเอามือออกจากคีย์บอร์ดเลย ไม่เพียงเท่านั้น 10 นิ้วของท่าน จะไม่หลุดออกแป้น a s d f space j k l : เลย แม้แต่ลูกศรขึ้นลง ก็ไม่ได้ใช้ ตัวเลข ก็ไม่ได้ใช้ อยากรู้แล้วใช้ไหมครับ ว่ามันทำงานอย่างไร
vi ประกอบด้วย 2 Mode คือ
  1. Mode command ไว้สำหรับใช้คำสั่ง Mode นี้ เพียงกด Esc ก็จะเข้าสู่ Mode command อัตโนมัติ (คิดอะไรไม่ออก กด Esc ลูกเดียว)
  2. Mode การพิมพ์ ไว้สำหรับเพิ่มข้อมูล เลื่อน Cursor ต่าง ๆ แต่เราต้องใช้ Command ก่อน เช่น หากต้องการเพิ่มอักษร ต้องสั่ง I (Insert) เสียก่อน และเมื่อพิมพ์จะเป็นการแทรกข้อความอัตโนมัติ
การเลื่อนทิศทาง (Motivation) 
สังเกตุนะครับ มือจะไม่ขยับไปใช้ ลูกศร ขึ้นลง เลย ทำให้ทำงานได้เร็วขึ้น
  • h = เลื่อนไปทางซ้าย
  • l = เลื่อนไปทางขวา
  • j = เลื่อนลง
  • k = เลื่อนขึ้น
  • หาก พิมพ์ 8l = เลื่อนไปทางขวา 8 ตัวอักษร
  • w , W = เลื่อนไปทางขวา 1 คำ เช่น this is test เมื่อกด w จะเลื่อน Cursor ไป 1 word Cursor จะไปยืนอยู่ที่ this is test เป็นต้น
  • { = เลื่อนไปยังต้น Paragraph
  • } = เลื่อนไปยังท้าย Paragraph
  • :หมายเลขบรรทัด = เลื่อนไปยังบรรทัดที่ต้องการ เช่น :10 หมายถึงไปบรรทัดที่ 10 เป็นต้น
  • $ = ไปตัวอักษรท้ายสุดของบรรทัด
  • 0 = ไปตัวอักษรตัวแรกสุด ของบรรทัด
การกระทำการ (Operator)
  • i = เพิ่มตัวอักษร (insert) ใช้งาน โดยพิมพ์ i แล้วพิมพ์ต่อได้เลย
  • I = เพิ่มตัวอักษรต้นบรรทัด
  • x = ลบตัวษรทีละ 1 ตัว
  • 10x = ลบตัวอักษร 10 ตัว
  • dw = ลบทั้งคำ
  • dd = ลบทั้งบรรทัด
  • yy = yank หมายถึง Copy ทั้งบรรทัด
  • p = วาง (Paste) วางบรรทัดล่างจาก Cursor อยู่
  • P = วาง (Paste) วางแทรกบรรทัดปัจจุบัน
การจัดการเกี่ยวกับไฟล์
  • :w ชื่อไฟล์ = save ไฟล ์ด้วยชื่อที่กำหนด
  • :wq = save ไฟล์ และออกจาก vi (Quit)
  • :q! = ออกจาก vi โดยไม่ Save
  • :set
    • set nu = สั่งให้ vi แสดงหมายเลขบรรทัด
    • set ic = สั่งให้เวลา Search ไม่ดูการค้น ตัวเล็ก ตัวใหญ่ ใด ๆ (Ignore Case)
    • set nu ic สั่งให้ทำงานทั้ง 2 แบบ
ลอง Telnet แล้วไปของพิมพ์เล่น ๆ ดูนะครับ ทางด้านบนนั้น เป็นเพียงแค่ความสามารถเพียงนิดเดียวของ Vi ครับ หวังว่าหลายคนที่มองหา Editor ฟรี ๆ ความสามารถสูง ๆ ที่พร้อมใช้ังานอยู่ใน Server อยู่แล้วครับ